Step-by-Step Guide: Creating Selectable Image Sections in React

Knowledge of basic image editing is one of the best nice-to-have skills as a software engineer, especially in the frontend domain. In specific situations, you will work with vectors and other image types where this knowledge pays off.
A couple of weeks ago I had to implement a React component that will allow our users to click on different sections of the image.
The image was a very complex human body map with many sections. The client just sent a PNG file and I had to do the rest.
To implement this I went for the following approach:
1) Convert PNG to SVG file
2) Draw and color selectable sections in SVG
3) Create a React component from SVG
4) Implement click logic
For this guide, I will use the following image of Super Mario:

The goal is to create a React component for coloring Mario's boots, pants, buttons, handshoes, etc.
For the sake of simplicity, a simple click will color the selected section in yellow if it's not selected, and vice-versa if it's already colored.
1) Convert PNG to SVG file
This is the first step that we need to make. SVG allows us to create sections inside the image and React works nicely with SVG files.
If you have a designer who can provide an SVG image with predefined and properly named sections, it will save you about 70% of time and effort for this task. If this is your case, you can skip to step 3.
For this guide, we will do everything from scratch.
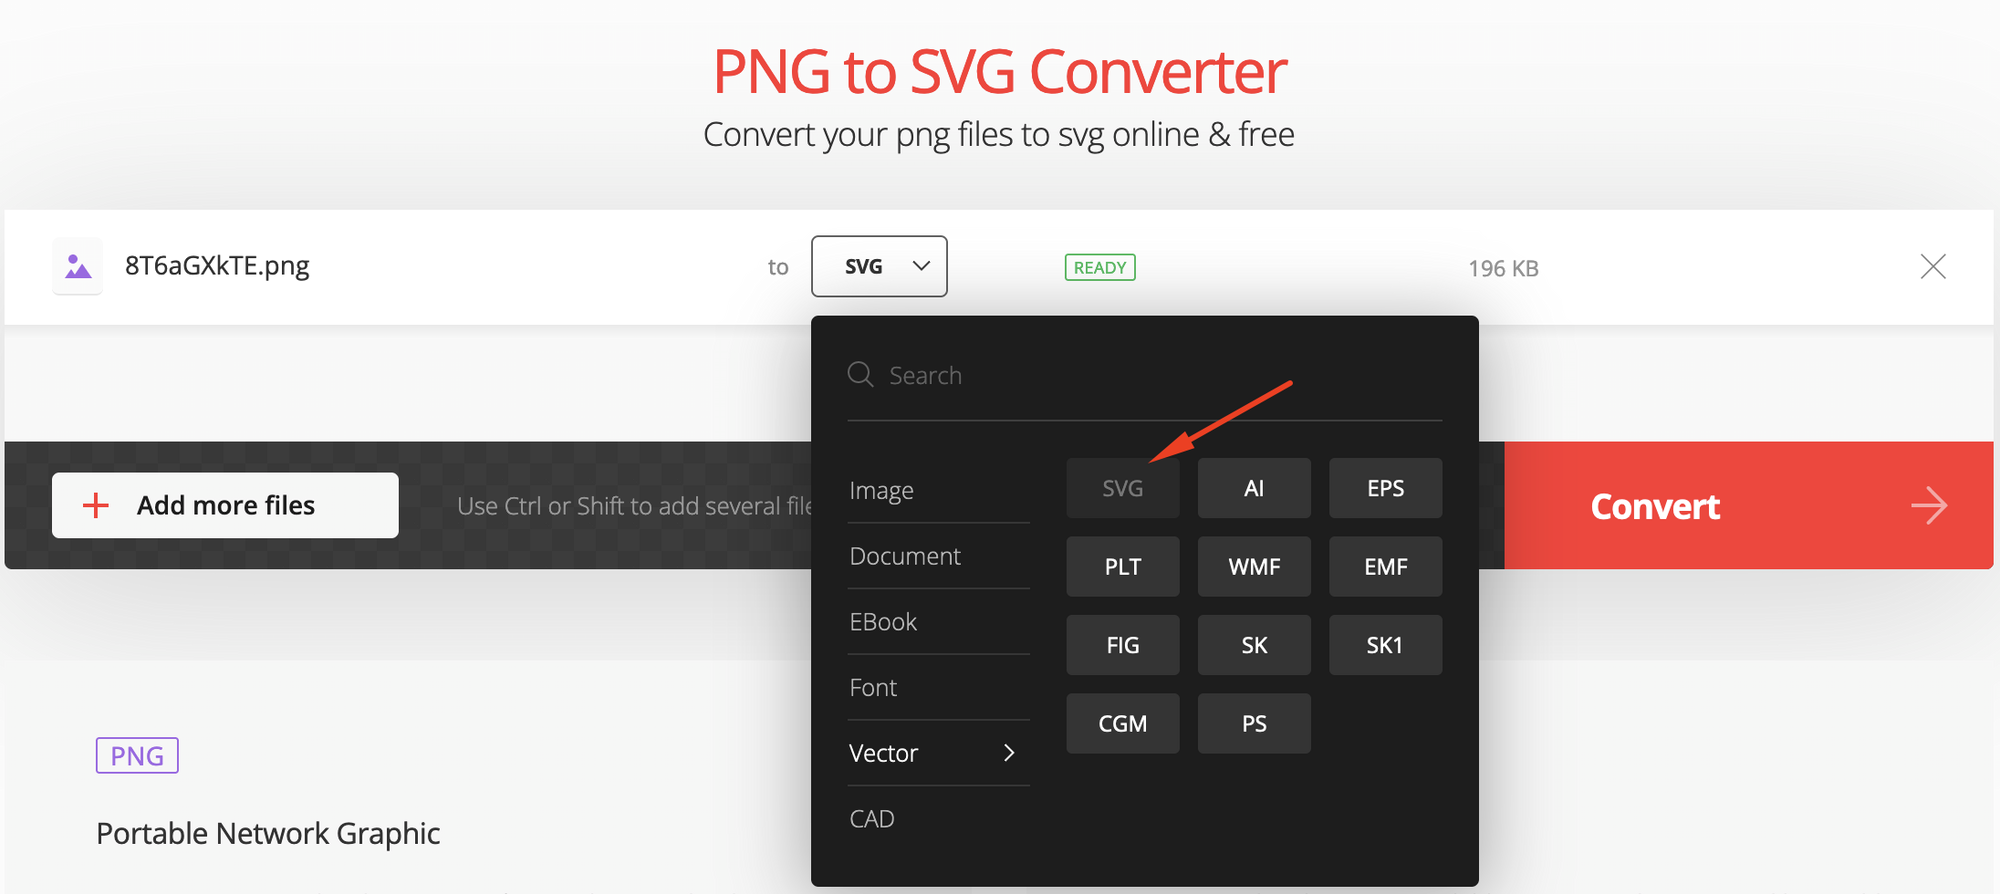
To convert PNG to SVG you can use any online tool. I prefer the convertio.co as it's simple and doesn't ask me for an email or account creation.
Upload your PNG, select Vector, and then SVG:
Download your SVG file and you are done with the first step.
2) Draw selectable sections
For this step, we will use Inkscape.
Inkscape is a free and open-source vector graphics editor. With it, we can create these selectable sections.
This step will take most of your time, depending on how complex your image is. For our Super Mario image, it is fairly simple.
So once you downloaded and installed Inkscape, open the SVG image and try to color any section with the Paint Bucket tool. You will notice that not the whole area of the section is colored properly and that there is some white area left uncolored which is not good:
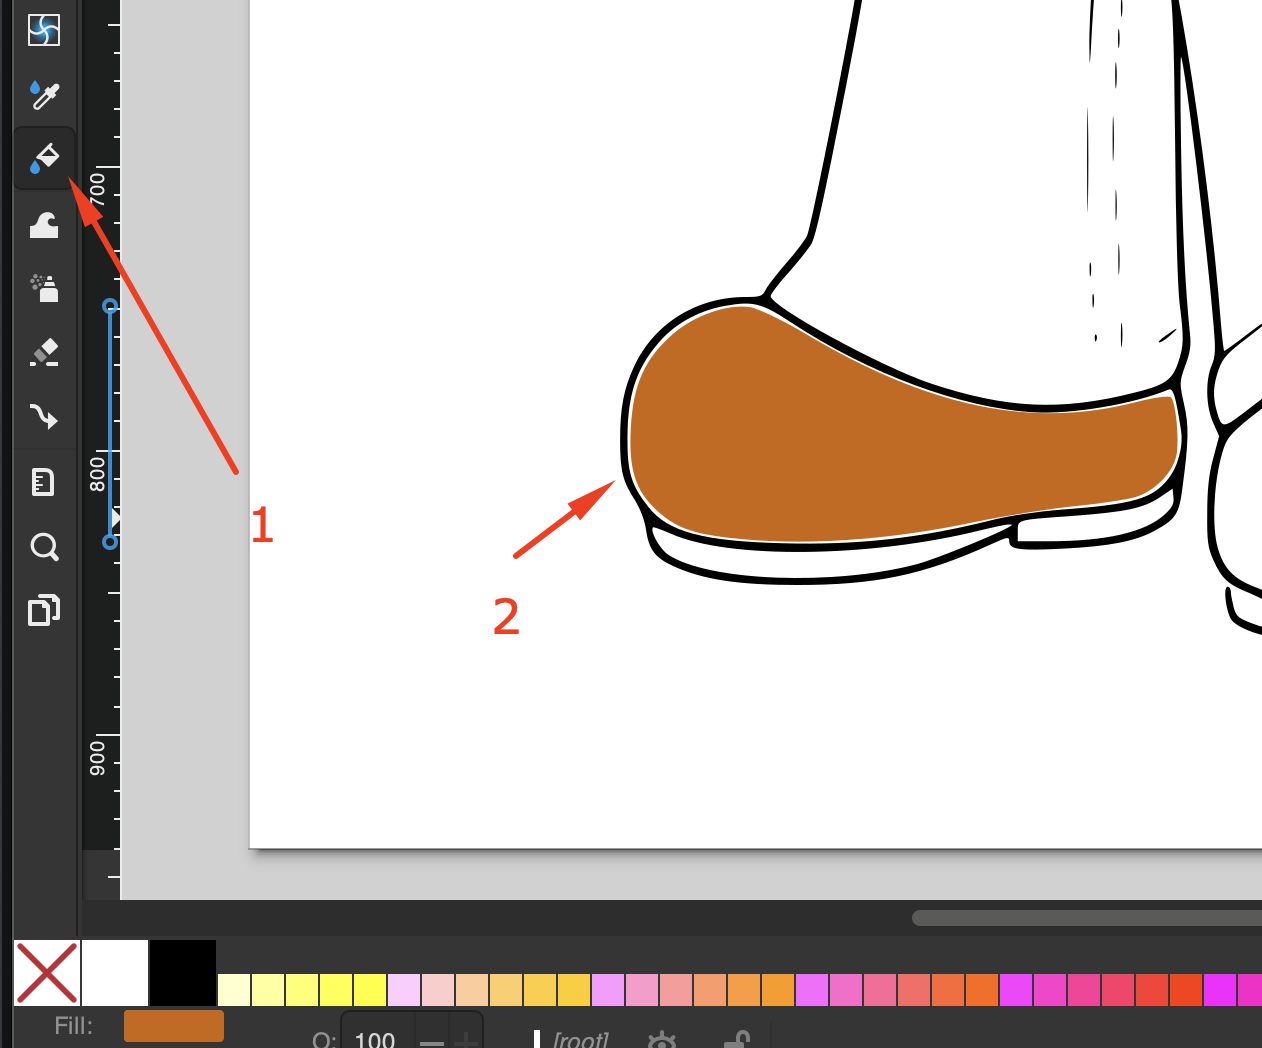
We want to have the whole section colored so obviously, this current section (SVG path) in the file is not good enough for our purpose.
To fix this we must create a new section (SVG path).
Select the pen tool, zoom in with CTRL + mouse scroll until you have enough visibility to draw. Then click near the black line region, point by point around the black line until you mark the area you want to be your selectable section.
In this example, I want to make a selectable section for this part of the boot:
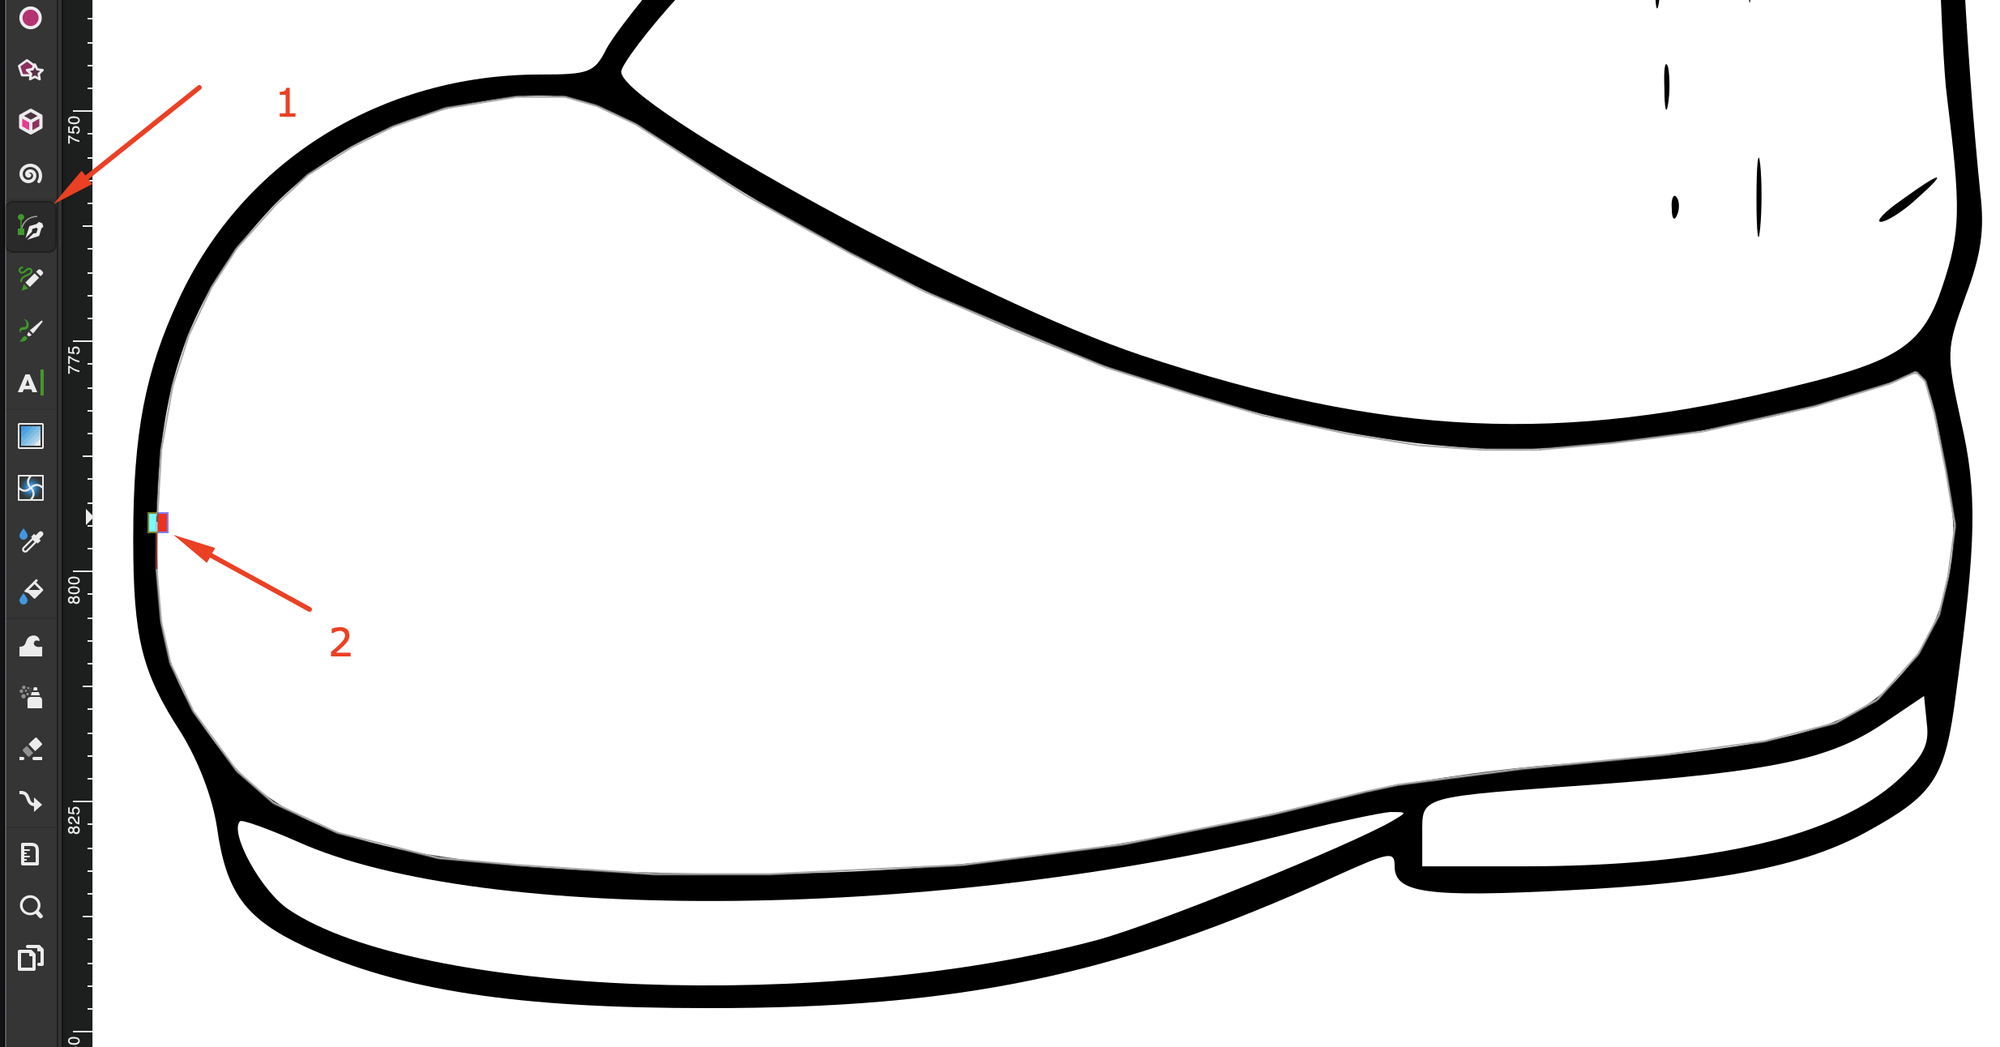
When you make a full circle around the selected section, click on the first pen point you created. This will close the selection and create a new SVG path.
When you try to color that path you will see it perfectly fits the area you selected with the pen tool. Don't bother yourself if you see tiny white parts because when the image is zoomed out, it won't be visible to a user.

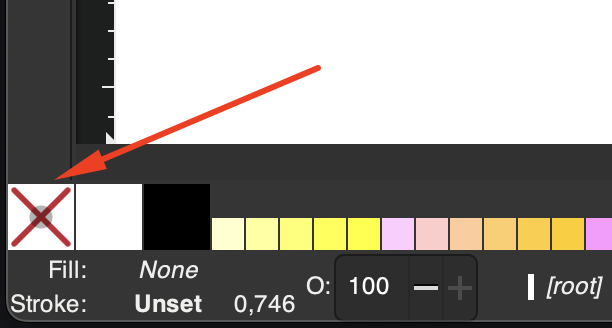
After that, make sure to remove the coloring. Fill must be set to none:
Now that we have a selectable section, we must identify it with a unique name. This is important as later we will need to have unique IDs for each selectable section.
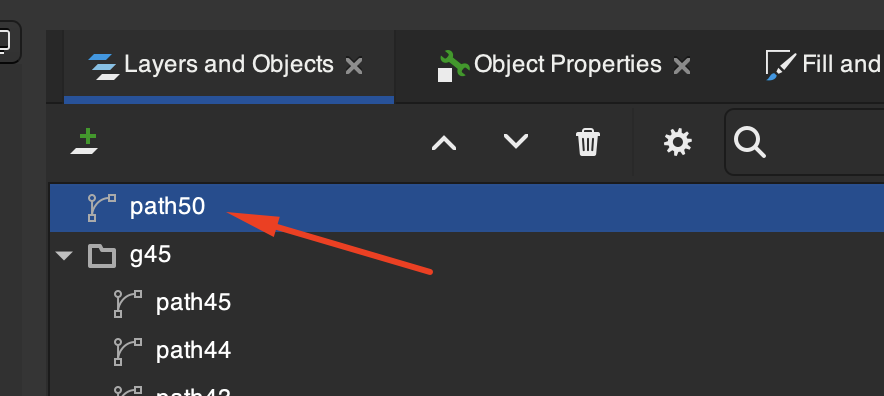
To do this, click on the newly created path. All paths have a name in the format "pathX". In this example it's "path50":
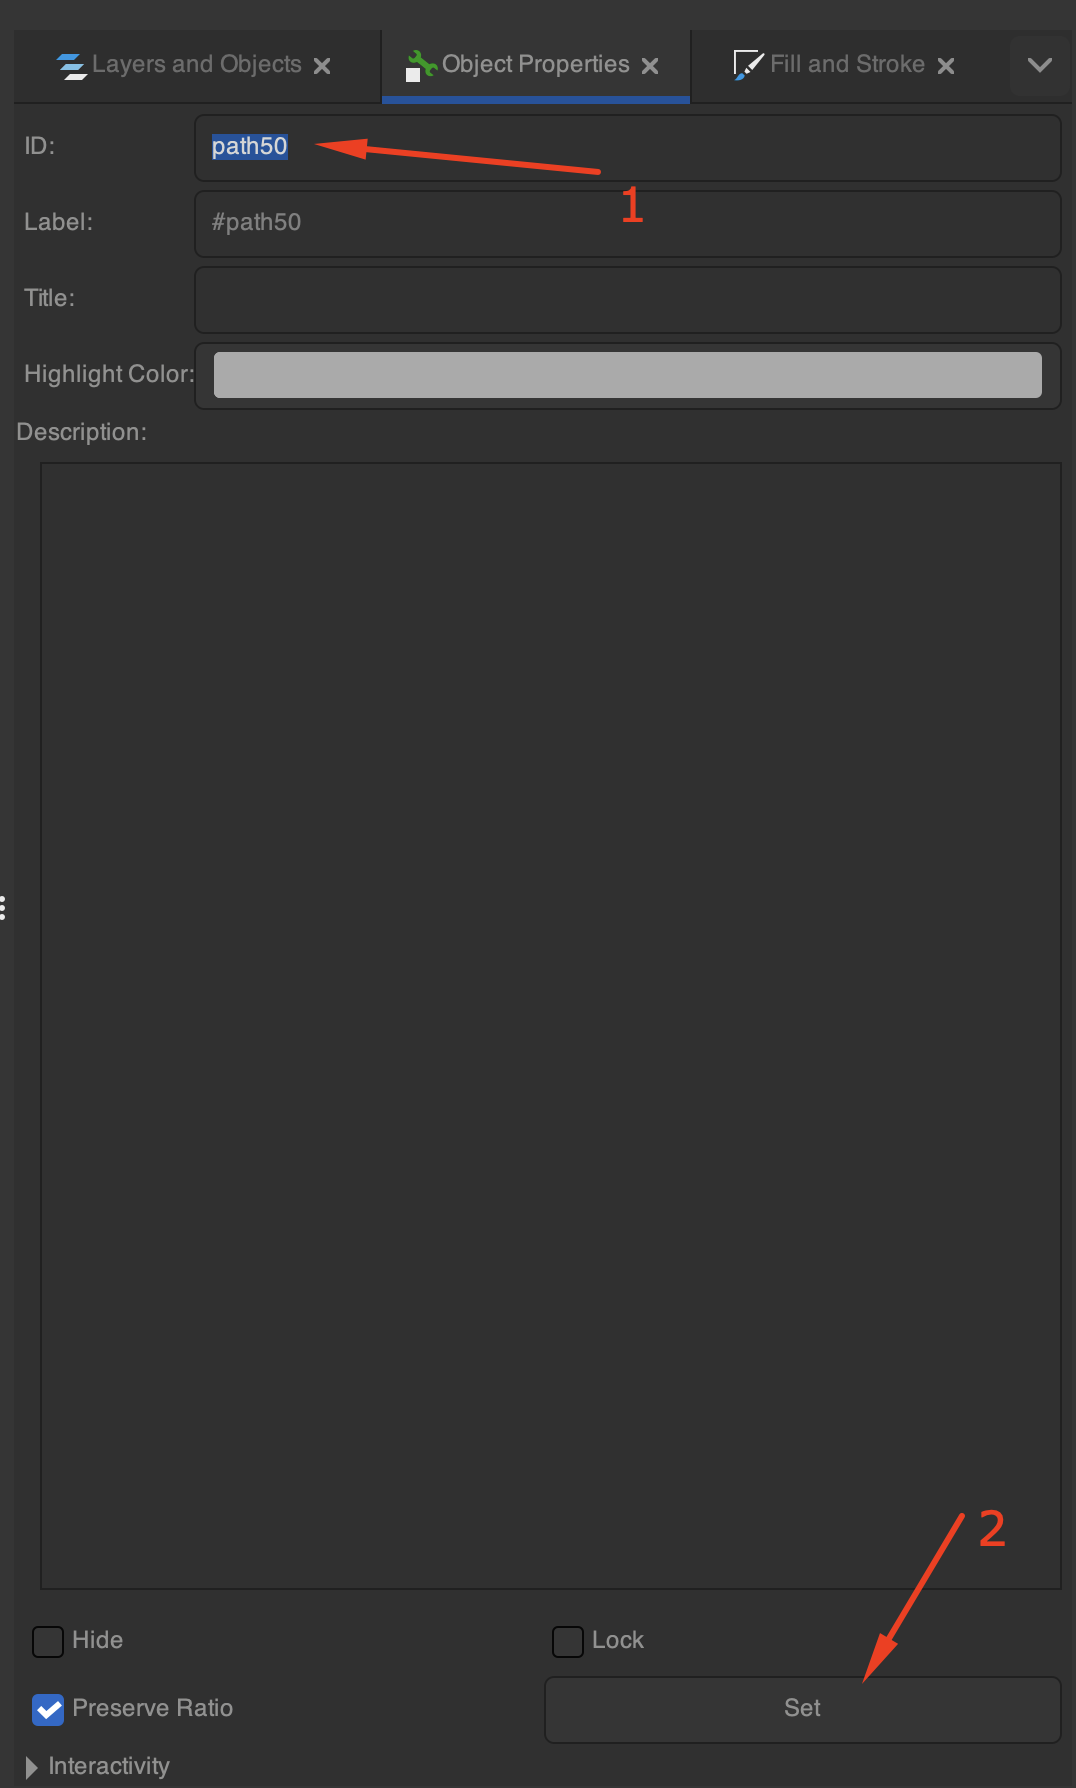
Now click on the "Object Properties" tab.
Update the ID field and click on "Set". I usually use upper case for IDs so this can be named LEFT_BOOT:
After this, hit CTRL+S (or CMD+S on MacOS) to save the changes. I forgot this a few times so I had to redefine IDs again. Make sure you don't make the same mistake as me.
Repeat the same process with the rest of the image and create as many selectable sections as you need.
You can also delete some redundant path elements from your SVG. This will make the SVG file a bit smaller in size. Just don't delete paths that will destroy the image. After each deletion, check the image.
3) Create a React component from SVG
After SVG work, we must convert our SVG file to a JSX component. You can do this part manually, but I prefer to use online tools to do this for me.
I recommend using svg2jsx.com for this purpose.
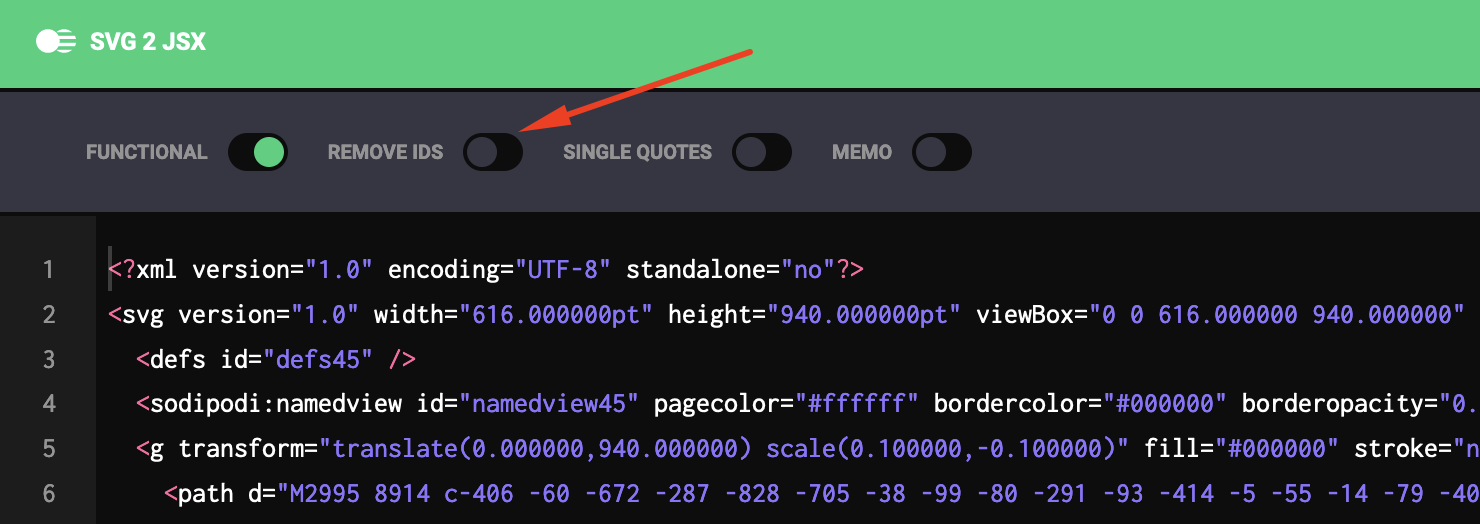
So go there, upload the image, and make sure you disable the "Remove IDs" option because we need IDs in our JSX component:
Inspect the right side and check if your paths with IDs are present there. If everything is ok, hit copy and paste content in the .jsx file inside your React project.
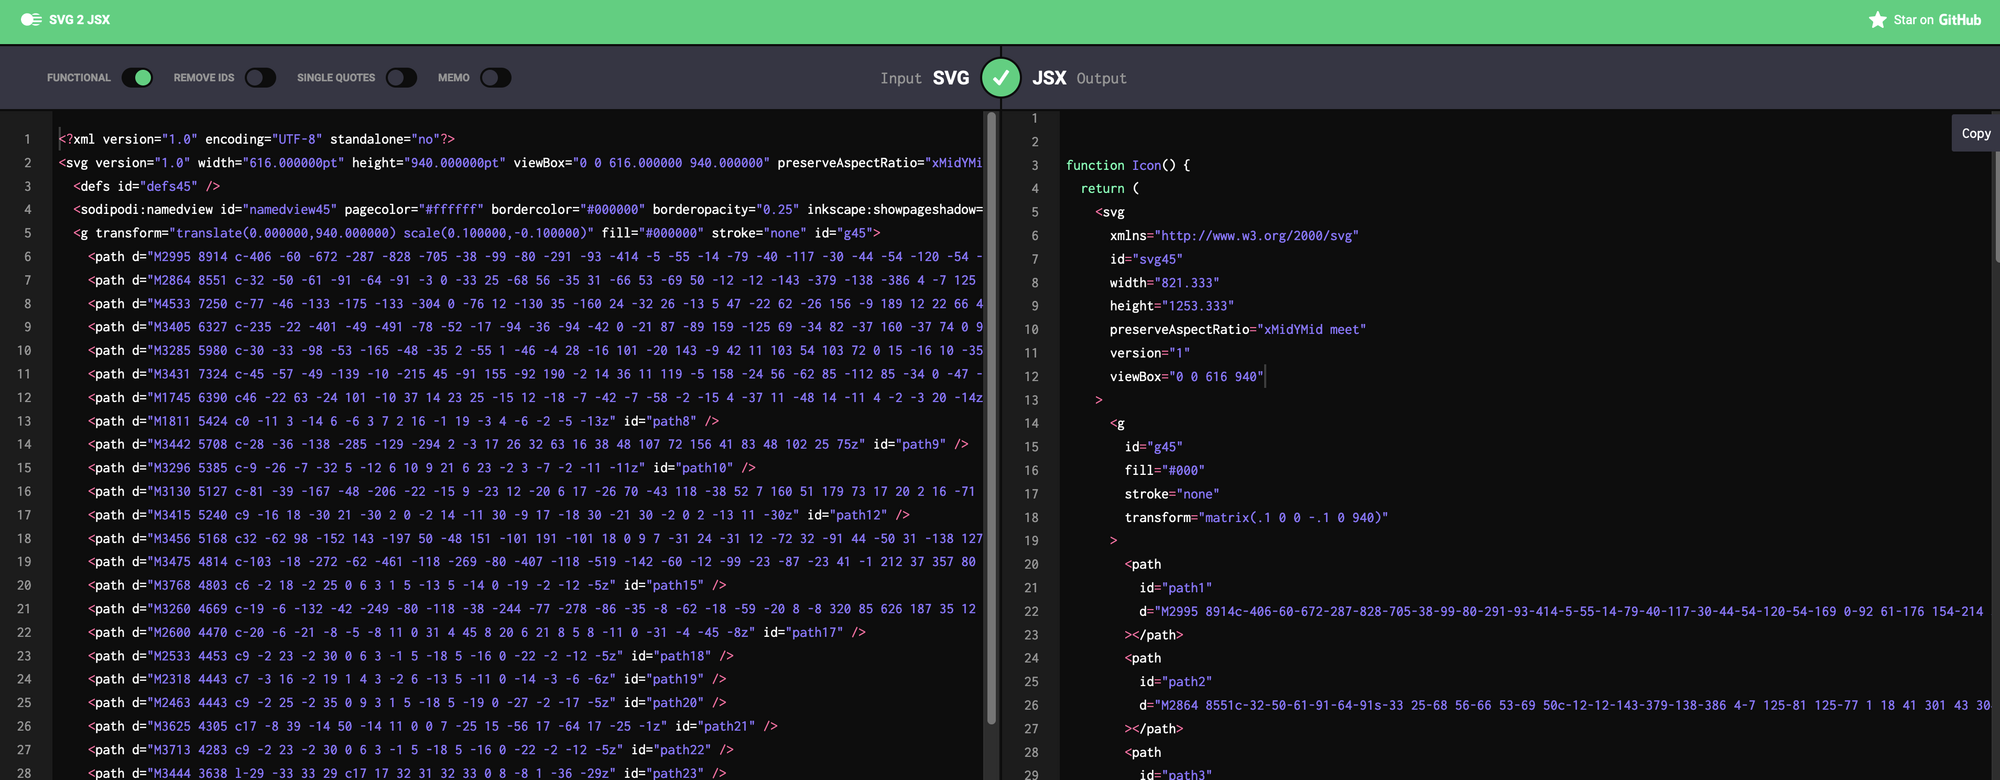
We can name the file SuperMario.jsx.
4) Implement click logic
This is the last part of this guide and I will only show you a core part of it as you might have different logic for how you want to color specific regions, handle clicks on sections, identify sections, etc.
First, we need to have some constants in our React project. We can add those IDs used in the image:
export const MARIO_PARTS = {
  // ...other parts
  RIGHT_BOOT: 'RIGHT_BOOT',
  LEFT_BOOT: 'LEFT_BOOT'
}
Then in our SuperMario.jsx file, we can add some props:
import React from "react";

function SuperMario({ onClickHandler, colors, partIds }) {
  return (
    <svg
      xmlns="http://www.w3.org/2000/svg"
      id="svg45"
      width="821.333"
      height="1253.333"
      preserveAspectRatio="xMidYMid meet"
      version="1"
      viewBox="0 0 616 940"
    >
      <g
        id="g45"
        fill="#000"
        stroke="none"
        transform="matrix(.1 0 0 -.1 0 940)"
      >
        <path
          id="path1"
          ...
        ></path>
        <path
          id="LEFT_BOOT"
          fill="none"
          strokeWidth="0.746"
          d="M133.605 794.589l.45-7.812 1.244-6.97 1.743-5.477 2.49-5.228 2.738-4.232 4.232-4.73 3.485-3.236 4.73-2.987 4.48-2.24 5.726-1.992 7.717-1.245h5.228l3.485.996 4.232 1.991 11.95 7.718 11.202 6.223 8.215 4.232 9.957 4.232 9.71 3.983 9.459 2.987 7.593 2.24 9.21 1.992 7.718 1.245 6.97.498h5.974l8.215-.747 9.71-1.244 12.197-2.739 8.215-2.49 2.739-1.244.995.996.996 3.485 1.245 6.223.996 5.975-.747 5.477-.996 4.232-2.24 4.232-4.481 4.979-4.481 2.489-7.717 1.992-10.954 1.493-15.434 1.494-7.717.996-5.726.746-3.485.747-10.207 2.49-16.18 3.236-17.427 2.24-20.91.996h-12.572l-14.937-.996-8.464-.747-10.953-2.738-6.97-3.236-3.983-3.485-4.73-6.473-2.49-5.227-.995-4.481-.498-5.726z"
          ></path>
        </g>
    </svg>
  );
}
These props will be used on specific path tags with IDs to handle user clicks. We have 3 props:
onClickHandler- function to handle click events on specific section pathcolors- a state with information about section paths, so we know if the specific section is colored or notpartIds- part IDs from our constants file
Now we can change the code in the LEFT_BOOT path tag to use these props:
import React from "react";

function SuperMario({ onClickHandler, colors, partIds }) {
  return (
    <svg
      xmlns="http://www.w3.org/2000/svg"
      id="svg45"
      width="821.333"
      height="1253.333"
      preserveAspectRatio="xMidYMid meet"
      version="1"
      viewBox="0 0 616 940"
    >
      <g
        id="g45"
        fill="#000"
        stroke="none"
        transform="matrix(.1 0 0 -.1 0 940)"
      >
        <path
          id="path1"
          ...
        ></path>
        <path
          id={partIds.LEFT_BOOT}
          onClick={() => onClickHandler(partIds.LEFT_BOOT)}
          fill={colors[partIds.LEFT_BOOT]}
          fillOpacity="0.6"
          strokeWidth="0.746"
          d="M133.605 794.589l.45-7.812 1.244-6.97 1.743-5.477 2.49-5.228 2.738-4.232 4.232-4.73 3.485-3.236 4.73-2.987 4.48-2.24 5.726-1.992 7.717-1.245h5.228l3.485.996 4.232 1.991 11.95 7.718 11.202 6.223 8.215 4.232 9.957 4.232 9.71 3.983 9.459 2.987 7.593 2.24 9.21 1.992 7.718 1.245 6.97.498h5.974l8.215-.747 9.71-1.244 12.197-2.739 8.215-2.49 2.739-1.244.995.996.996 3.485 1.245 6.223.996 5.975-.747 5.477-.996 4.232-2.24 4.232-4.481 4.979-4.481 2.489-7.717 1.992-10.954 1.493-15.434 1.494-7.717.996-5.726.746-3.485.747-10.207 2.49-16.18 3.236-17.427 2.24-20.91.996h-12.572l-14.937-.996-8.464-.747-10.953-2.738-6.97-3.236-3.983-3.485-4.73-6.473-2.49-5.227-.995-4.481-.498-5.726z"
          ></path>
        </g>
    </svg>
  );
}
Proceed to do this for every other <path> for a selectable section. You can also tweak some path properties like fillOpacity to fit your needs.
After that, you can use this component:
import React, { useState } from 'react';
import SuperMario from '../components/SuperMario';
import { MARIO_PARTS } from '../constants';

const COLORS_CONFIG = {
  default: 'white',
  selected: 'yellow',
};

const initialState = Object.entries(MARIO_PARTS).reduce(
  (acc, [key]) => {
    acc[key] = COLORS_CONFIG.default;
    return acc;
  },
  {}
);

const SuperMarioClicker = () => {
  const [colors, setColors] = useState(initialState);

  const onClickHandler = partId => {
    const currentColor = colors[partId];
    const newColor = currentColor === COLORS_CONFIG.default ? COLORS_CONFIG.selected : COLORS_CONFIG.default;
    setColors({ ...colors, [partId]: newColor });
  };

  return (
      <SuperMario
        onClickHandler={onClickHandler}
        colors={colors}
        partIds={MARIO_PARTS}
      />
  );
};

export default SuperMarioClicker;
Here is a breakdown of the code:
- first, we import
SuperMario.jsxandMARIO_PARTSconstant - then we create the initial state object. Every key in the object is a unique Super Mario part ID, and every value is color. For a start when nothing is selected, all Super Mario parts are white color, which is the default color.
- in the component, we have our state and
onClickHandlerfunction. When a specific part is selected, we check the current color for that part. If it's thedefaultone, we change it toselected, and vice versa. - finally, we render the
SuperMariocomponent and pass all the props needed.
Bonus: Add gradient coloring to a specific section
In the original task I mentioned at the start of the article, I had to add gradient coloring to a couple of image sections.
In case you need to do the same, here is how you can do it:
import React from "react";

function SuperMario({ onClickHandler, colors, defaultColor, partIds }) {
  return (
    <svg
      xmlns="http://www.w3.org/2000/svg"
      id="svg45"
      width="821.333"
      height="1253.333"
      preserveAspectRatio="xMidYMid meet"
      version="1"
      viewBox="0 0 616 940"
    >
      <g
        id="g45"
        fill="#000"
        stroke="none"
        transform="matrix(.1 0 0 -.1 0 940)"
      >
        <defs>
          <linearGradient id="redGradient1" x1="0%" y1="100%" x2="0%" y2="0%">
            <stop offset="0%" style={{ stopColor: 'rgb(187, 28, 28)', stopOpacity: 1 }} />
            <stop offset="100%" style={{ stopColor: 'rgb(209, 114, 114)', stopOpacity: 1 }} />
          </linearGradient>
        </defs>
        <path
          id="path1"
          ...
        ></path>
        <path
          id={partIds.LEFT_BOOT}
          onClick={() => onClickHandler(partIds.LEFT_BOOT)}
          fill={colors[partIds.LEFT_BOOT] === defaultColor ? defaultColor : 'url(#redGradient1)'}
          fillOpacity="0.6"
          strokeWidth="0.746"
          d="M133.605 794.589l.45-7.812 1.244-6.97 1.743-5.477 2.49-5.228 2.738-4.232 4.232-4.73 3.485-3.236 4.73-2.987 4.48-2.24 5.726-1.992 7.717-1.245h5.228l3.485.996 4.232 1.991 11.95 7.718 11.202 6.223 8.215 4.232 9.957 4.232 9.71 3.983 9.459 2.987 7.593 2.24 9.21 1.992 7.718 1.245 6.97.498h5.974l8.215-.747 9.71-1.244 12.197-2.739 8.215-2.49 2.739-1.244.995.996.996 3.485 1.245 6.223.996 5.975-.747 5.477-.996 4.232-2.24 4.232-4.481 4.979-4.481 2.489-7.717 1.992-10.954 1.493-15.434 1.494-7.717.996-5.726.746-3.485.747-10.207 2.49-16.18 3.236-17.427 2.24-20.91.996h-12.572l-14.937-.996-8.464-.747-10.953-2.738-6.97-3.236-3.983-3.485-4.73-6.473-2.49-5.227-.995-4.481-.498-5.726z"
          ></path>
        </g>
    </svg>
  );
}
As you can see, it's nothing complex.
Gradient definitions are added in defs tag, each with its unique ID. You can add as many definitions as you want.
Then you can use defined gradients as any color code. You just need to add url() function call and pass gradient ID when using it.
Happy coding! 😃
Comments ()